Overview
Sellercloud’s Orderback application allows customers to independently initiate, manage, and process returns of purchased items as well as place new orders without direct assistance from a customer service representative. It provides the end user with tools to request refunds, replacements, or exchanges, generate return labels, and track return shipments.
The Orders and Returns Portal is accessible at https://xyz.orderback.io, where xyz is your server’s Base URL. It provides a quick and user-friendly way for your customers to do the following:
- View a list of all their orders.
- See payment and shipping statuses.
- Pay for any unpaid orders through Waytopay.me.
- Request refunds, exchanges, or replacements.
- Place new orders.
Order Lookup
When customers access the Orders and Returns Portal, their first step is to look up their orders. They can do so either with their email address or order number.
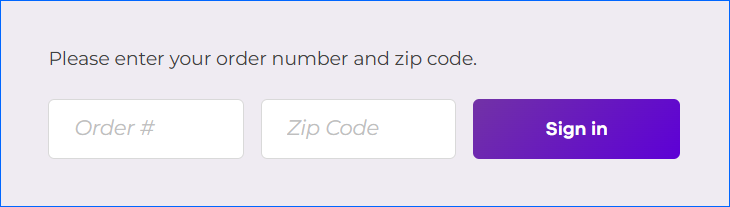
As an Orderback administrator, you can manage the available options using the Hide Email Login Option setting in General Settings > Workflow Options. When disabled, customers must use their email address to look up their orders. When enabled, they can only search by order number and ZIP code, which can be useful when dealing with Amazon customers.
To look up orders on Orderback:
- Go to https://xyz.orderback.io, where xyz is your server’s Base URL.
- If the Hide email login option setting is disabled, a customer must enter their email address in the Email address field and click Next.
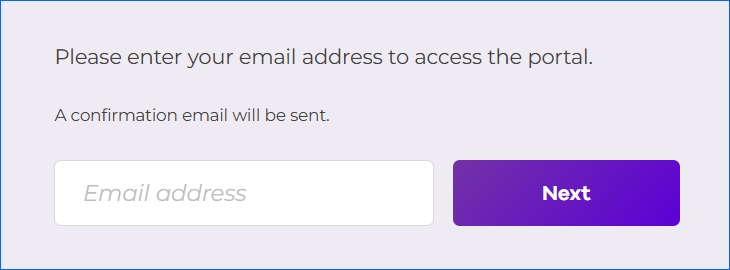 An email with a one-time verification code will be sent to their address. Entering the code on the Orderback page will let them view and manage all orders associated with that account in the Orders and Returns Portal. The email body is determined based on the first template of the Email Templates page.
- If the Hide email login option setting is enabled, customers must enter their Order # and Zip Code instead. No security code is required in this case.
Order Management
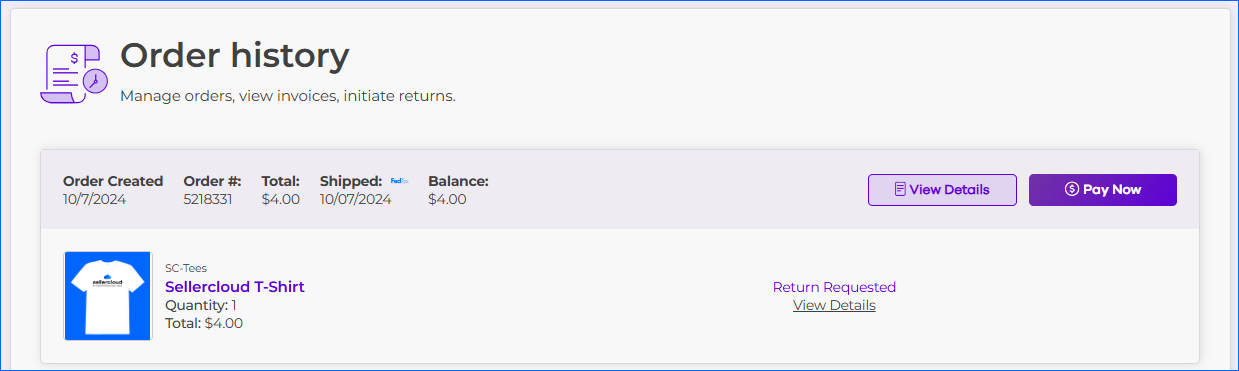
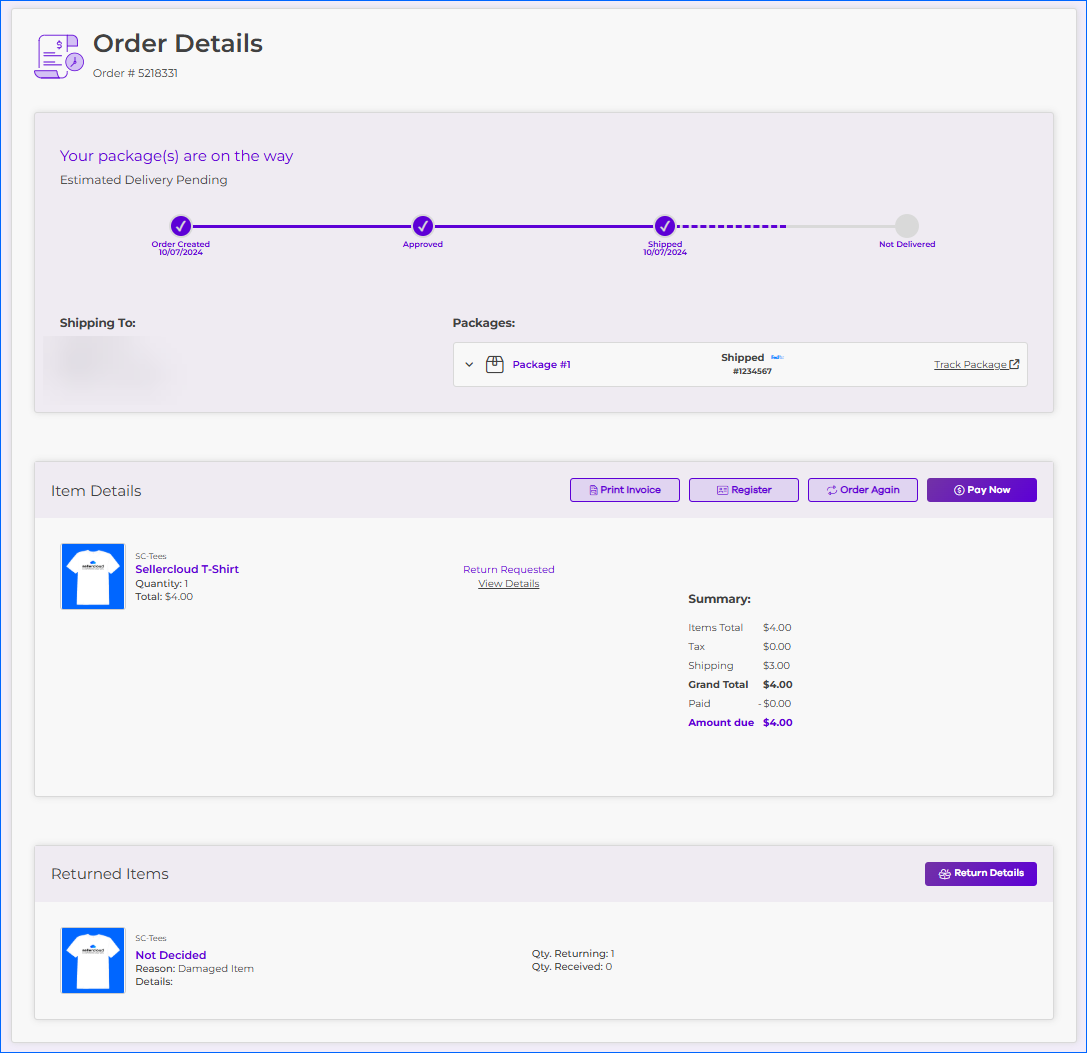
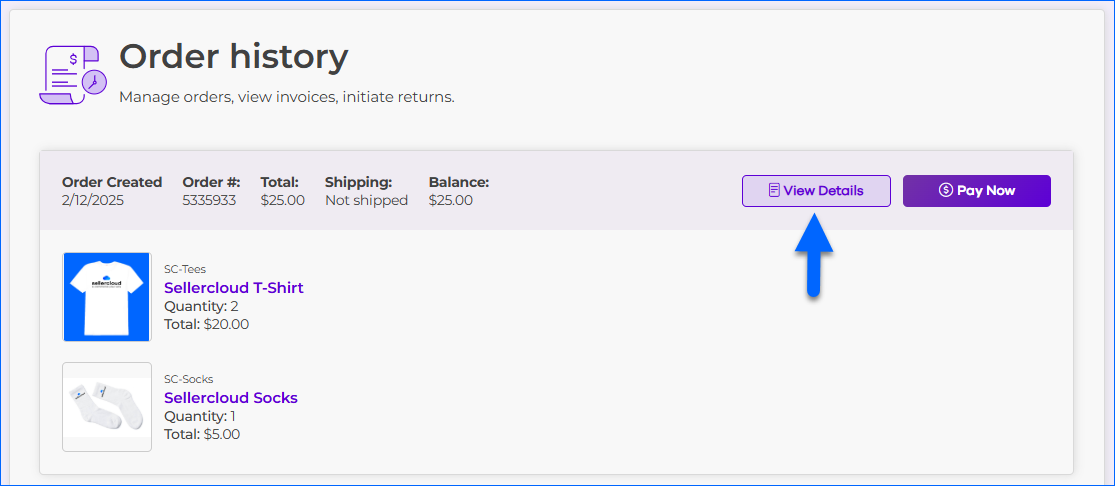
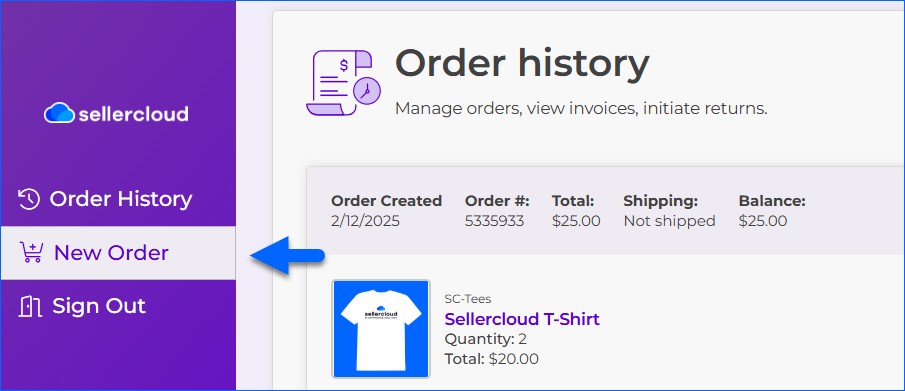
The following information is available to the customer once they look up orders on the Order History page:
- Order Created – The date when the order was placed.
- Order # – The order number from Sellercloud.
- Total – The total amount the customer paid.
- Shipping – The order’s Shipping Status.
- Balance – The amount remaining to be paid on the order.
- View Details – Leads to the Order Details page in Orderback.
- Pay Now – Generates and opens a Waytopay.me link for the order. This action is available for Unpaid orders and if the Display payment status and WayToPay.me link General Setting is enabled.
- View Return Details – Leads to the RMA Details page if there is an existing return linked to the order.
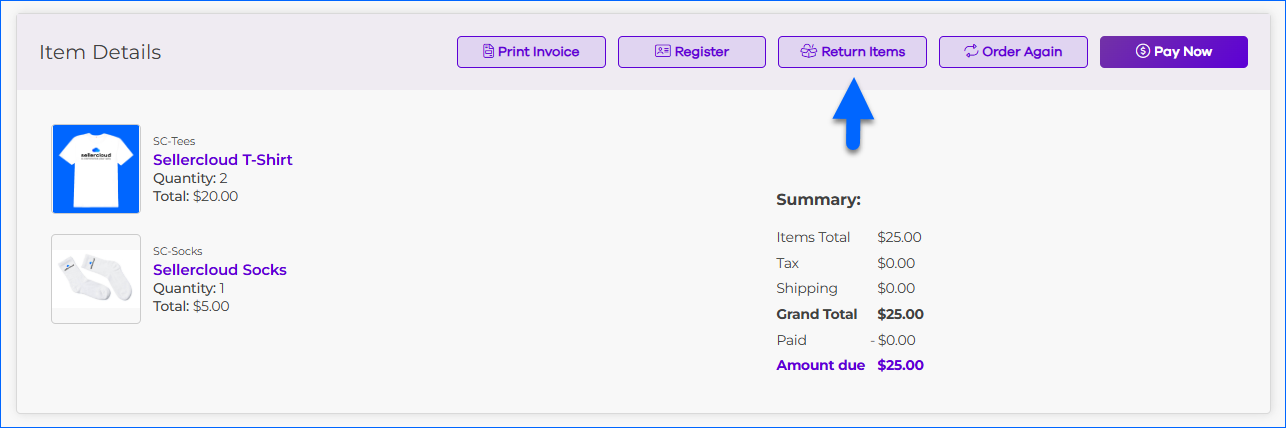
The following actions are available for each order on its Order Details page:
- Print Invoice – Generate a PDF version of the order’s invoice.
- (BETA) Register – Register your products for warranty.
- Return Items – Initiate a return for the order.
- Order Again – Create a new order with the same items.
- Pay Now – Creates a Waytopay.me link, which allows them to pay for the order. Only orders that are unpaid and in process have this option. The Display payment status and WayToPay.me link General Setting must be enabled.
- Return Details – Leads to the RMA Details page if there is an existing return linked to the order.
Initiate Returns
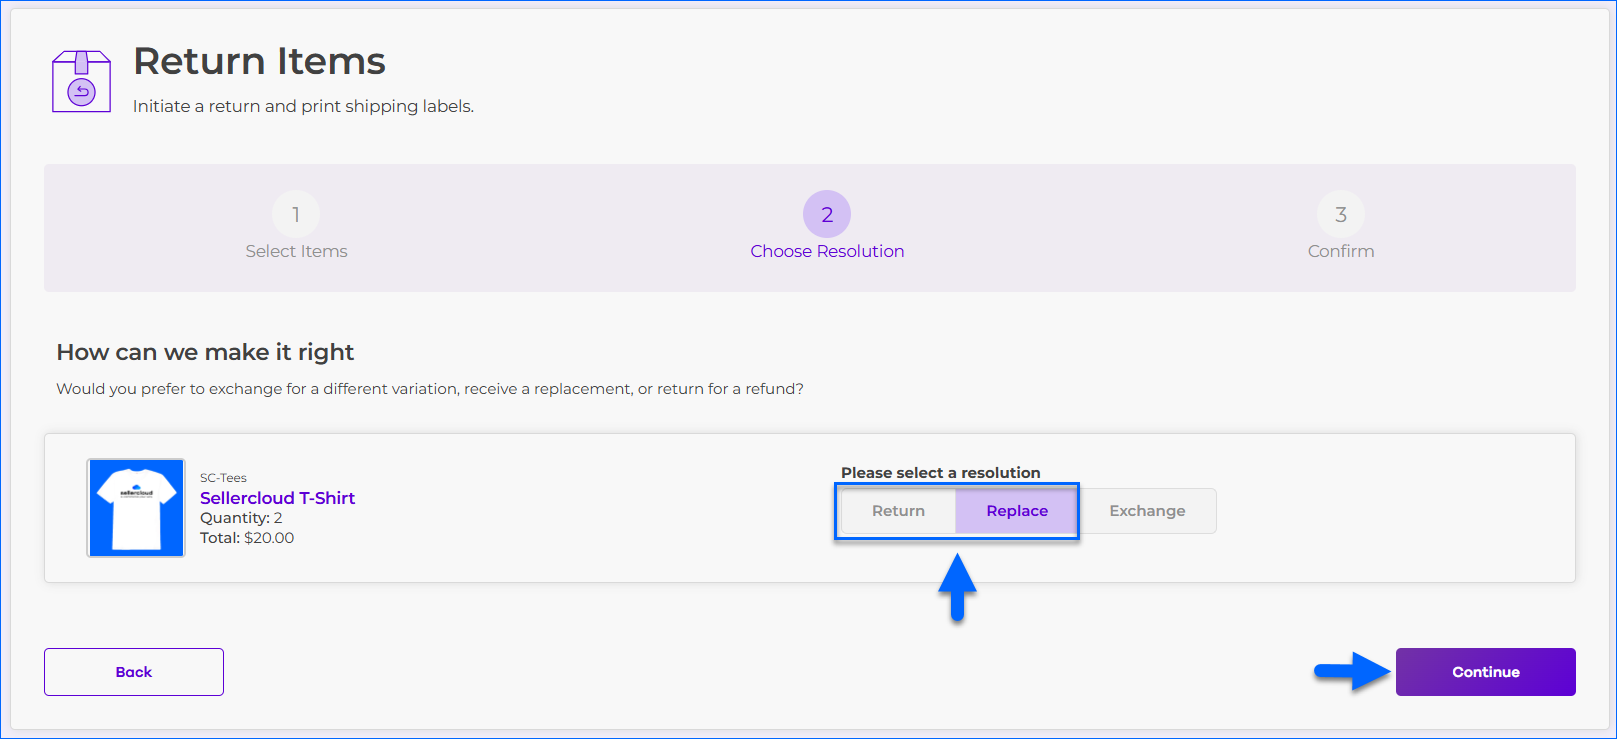
Customers can initiate RMAs on the Orders and Returns Portal. When creating an RMA, they can choose whether to receive a refund or a replacement. If they want to return a Variation Product, they will also have the option to exchange it for another variation.
Refund or Replacement
To initiate an RMA and request a refund or a replacement, the customer would:
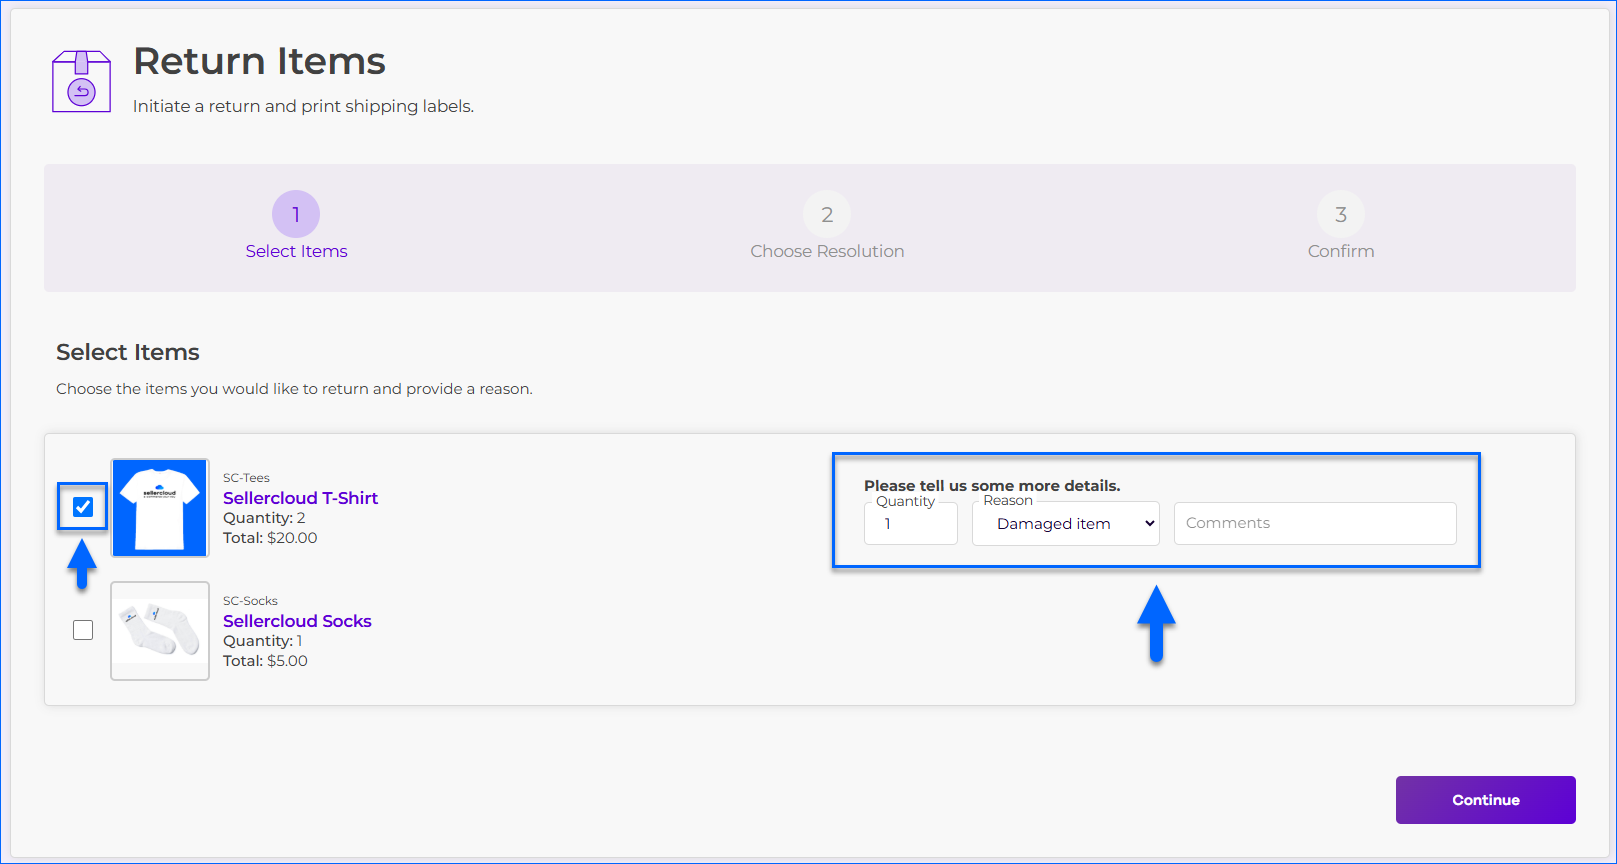
- Click View Details on the Order History page.
- On the Order Details page, click the Return Items button next to an order.
- Check the box next to each item they want to return.
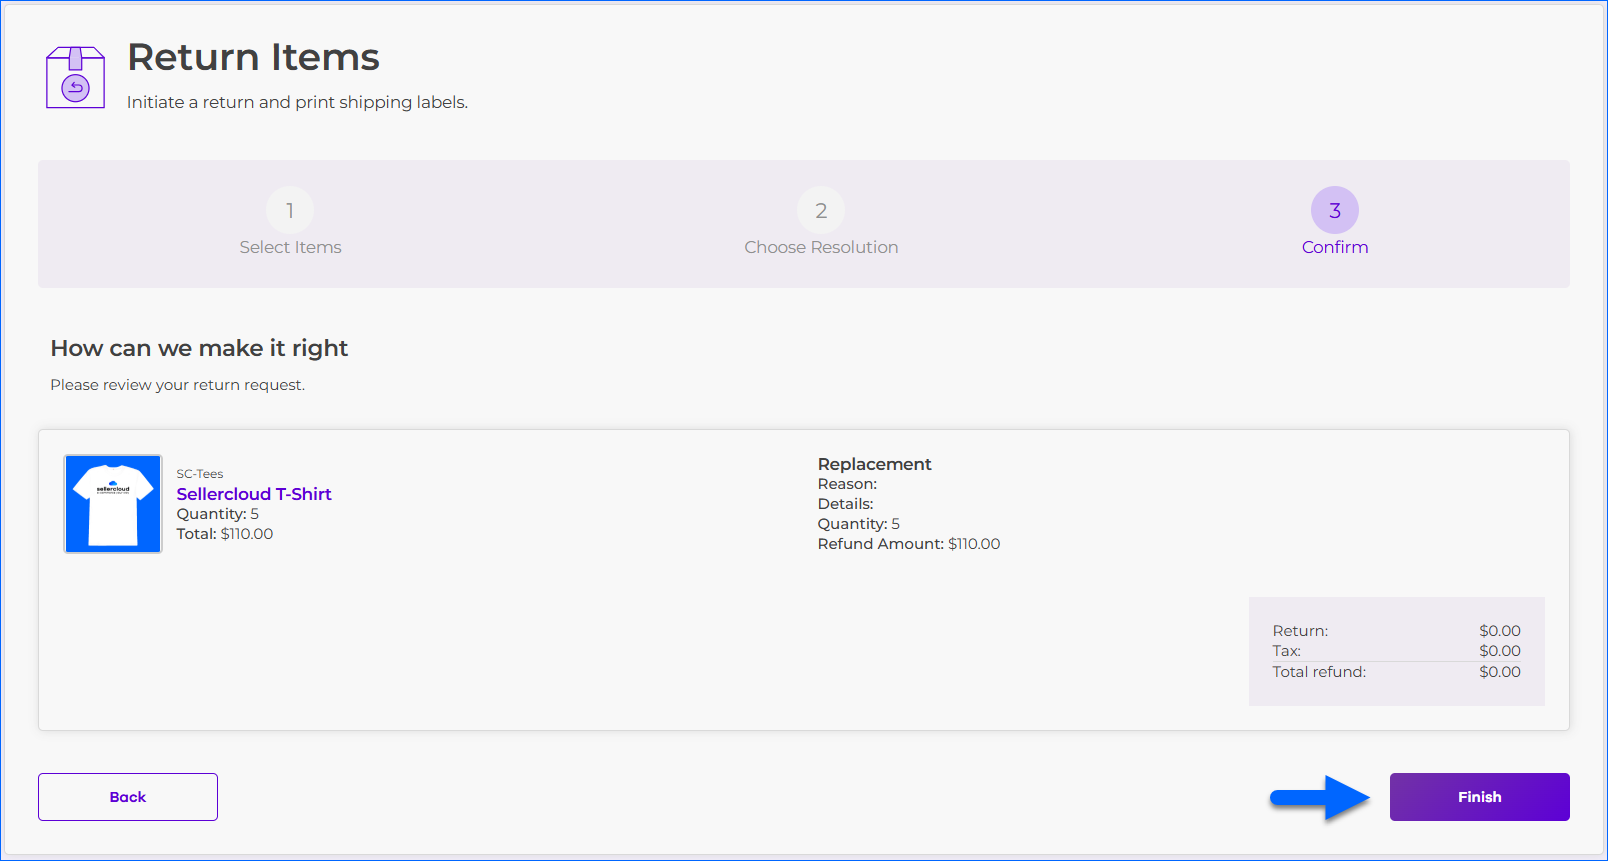
- Specify the Quantity, the Reason for the return, and any additional Comments, and click Continue.

- Select the resolution – Refund or Replace. Orderback sets the resolution in Sellercloud, and depending on Sellercloud settings, it can also create a replacement order in Sellercloud.
- Click Continue.
- Review the details and click Finish to submit the request.
- If the order has not been shipped yet: An RMA will not be created since the items are not being returned to your warehouse. The order’s Order Status will be set to On Hold, and Notes of the General type will be created on the Order Details Page in Sellercloud with details about the customer’s request.
- If the order has already been shipped: An RMA will be created automatically. Notes of the General type will be created on the Order Details Page in Sellercloud with details about the customer’s request.
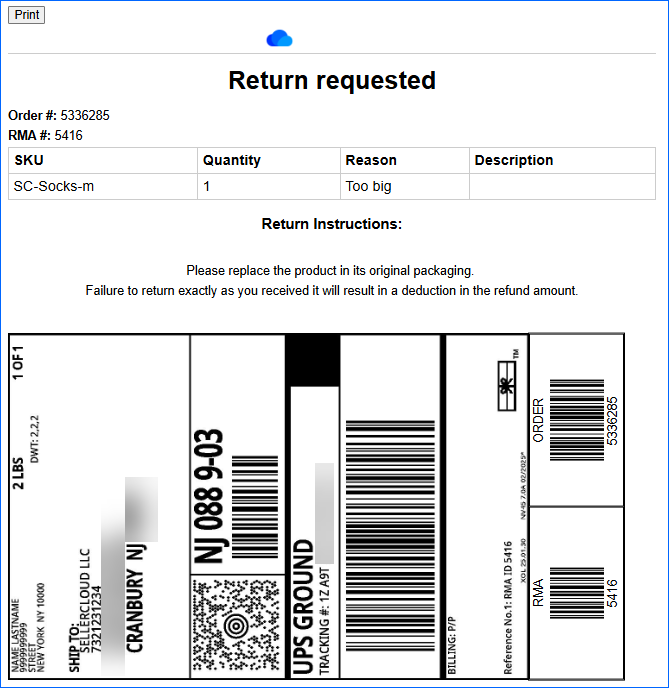
- Click the Print Label button to generate the return label.
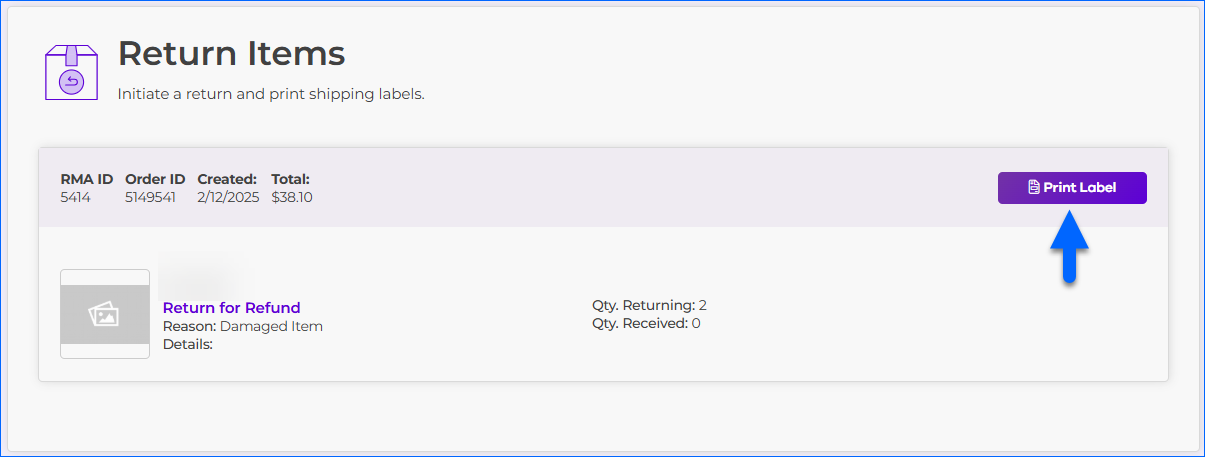
- The Orderback RMA Details page with return instructions and shipping labels appears. The customer can click the Print button to print the page. They will also receive an email confirmation based on the second template on the Email Templates page.
If the Require approval before shipping RMA setting is enabled on the General Settings page, the shipping labels will become available after you approve the RMA on the RMA Dashboard. If the setting is disabled, a label will be generated automatically based on your pre-defined Shipping Rules.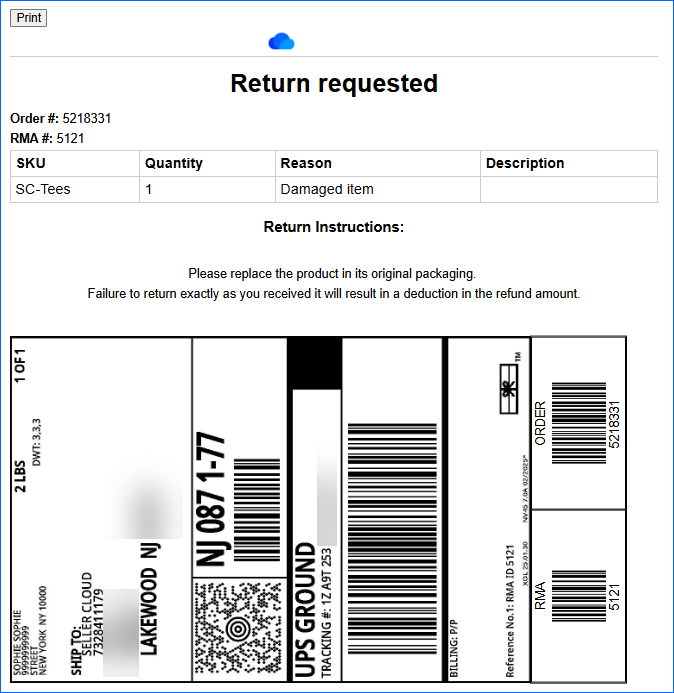
- The original order will still be visible in the Orders and Returns Portal.
- If the order was shipped before the customer initiated the return, they’ll see that an RMA has been requested. They can click View Details to go to the RMA Details page.
- If the order was not shipped before the customer requested the RMA, they will see that it was placed on hold and will not be shipped.
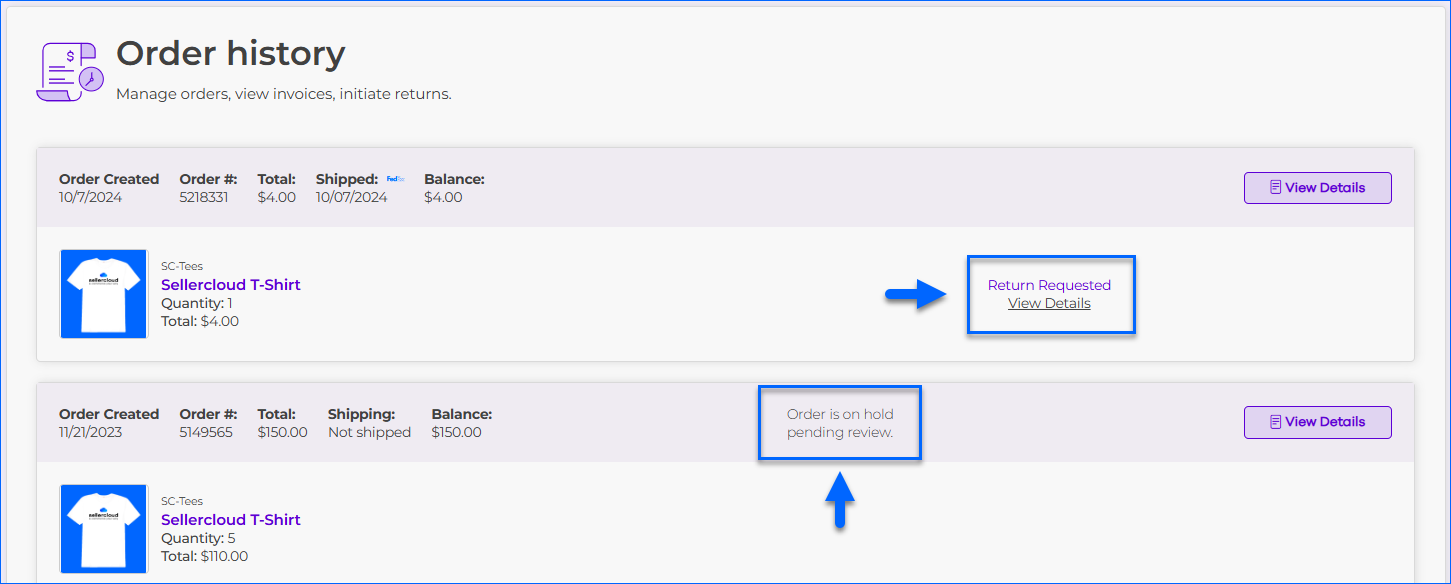
- If the order was shipped before the customer initiated the return, they’ll see that an RMA has been requested. They can click View Details to go to the RMA Details page.
Exchange
To create an RMA and request an exchange for another product variation as a customer:
- Click View Details on the Order History page for an order with a Variation Product.
- On the Order Details page, click the Return Items button next to an order.
- Check the box next to each item they want to return.
- Specify the Quantity, the Reason for the return, and any additional Details, and click Continue.
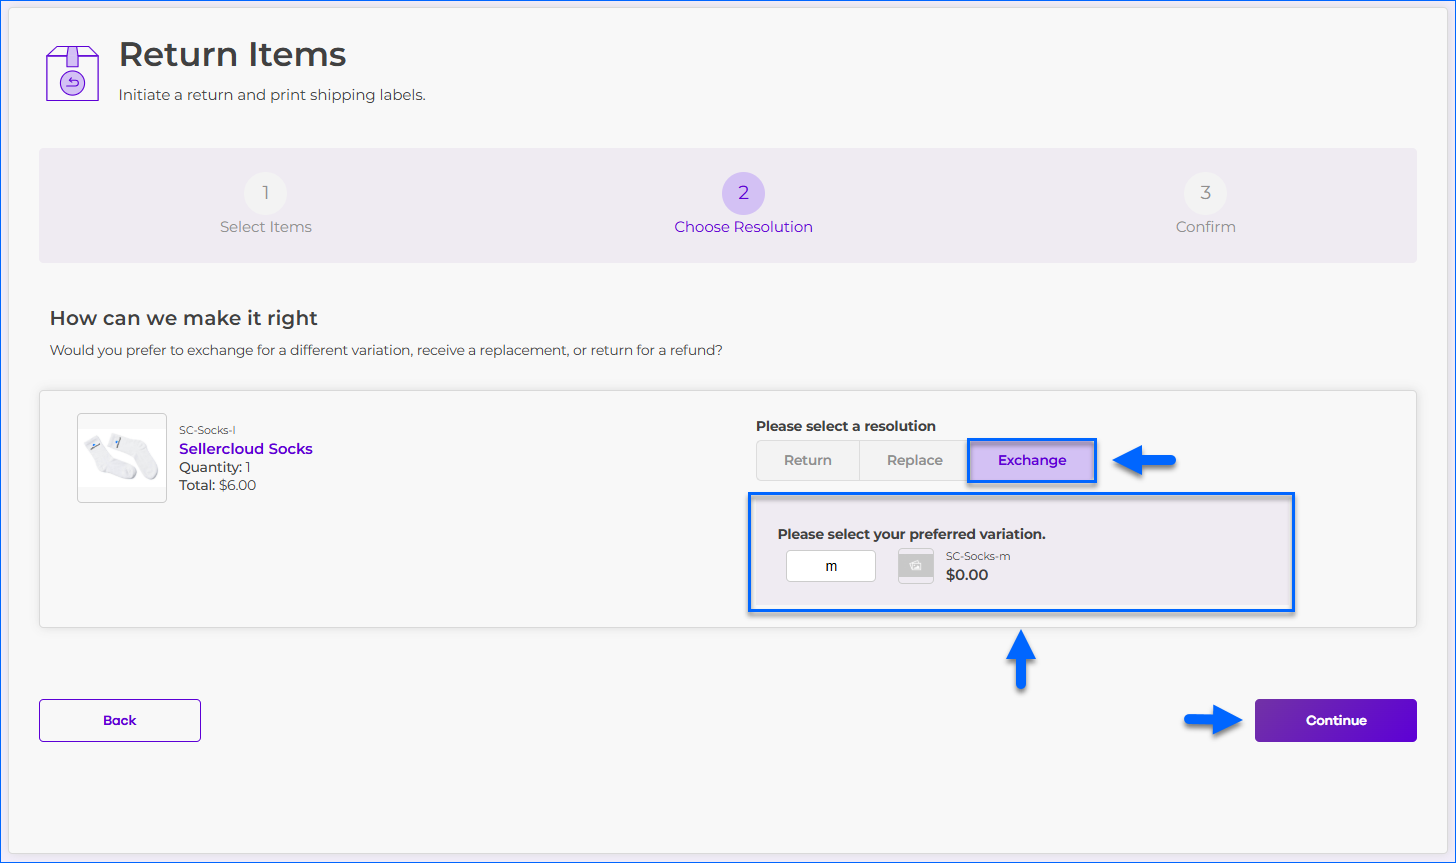
- Set the resolution to Exchange. Orderback sets the resolution in Sellercloud and, depending on Sellercloud settings, can also create the exchange order in Sellercloud.
- Select the new variation.
- Click Continue at the bottom of the page.
- Click Finish to submit the request.
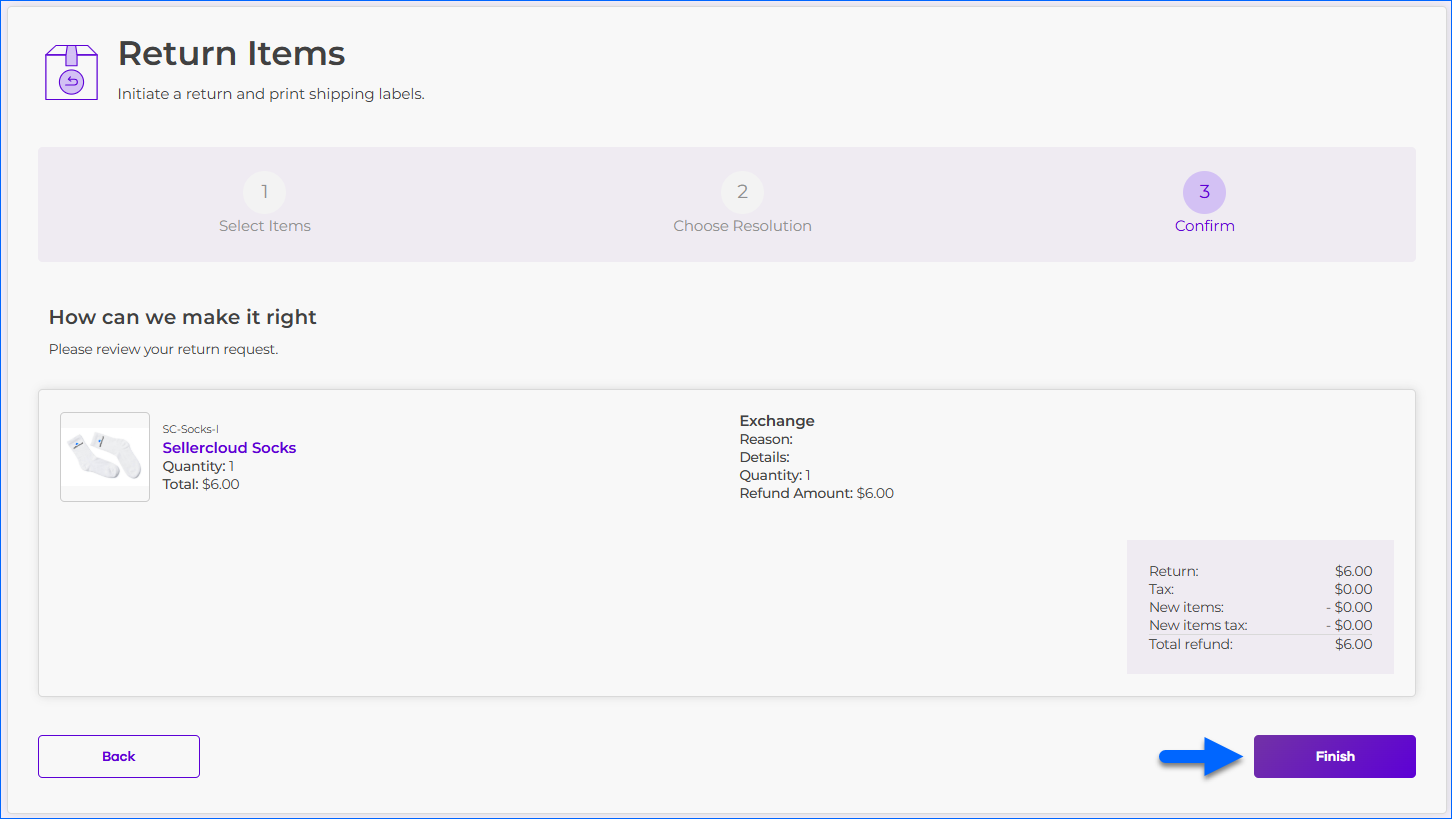
- If the order has already been shipped: An RMA will be created automatically. Notes of the General type will be created on the Order Details Page in Sellercloud to provide details about the customer’s request.
- If the order has not been shipped yet: An RMA will not be created since the items are not being returned to your warehouse. The order’s Order Status will be set to On Hold, and Notes of the General type will be created on the Order Details Page in Sellercloud to provide details about the customer’s request.
- If the order has already been shipped: An RMA will be created automatically. Notes of the General type will be created on the Order Details Page in Sellercloud to provide details about the customer’s request.
- Click the Print Label button to generate the return label. Click the View Details button to see the new order with your exchange items or Pay Now to generate a Waytopay.me link.
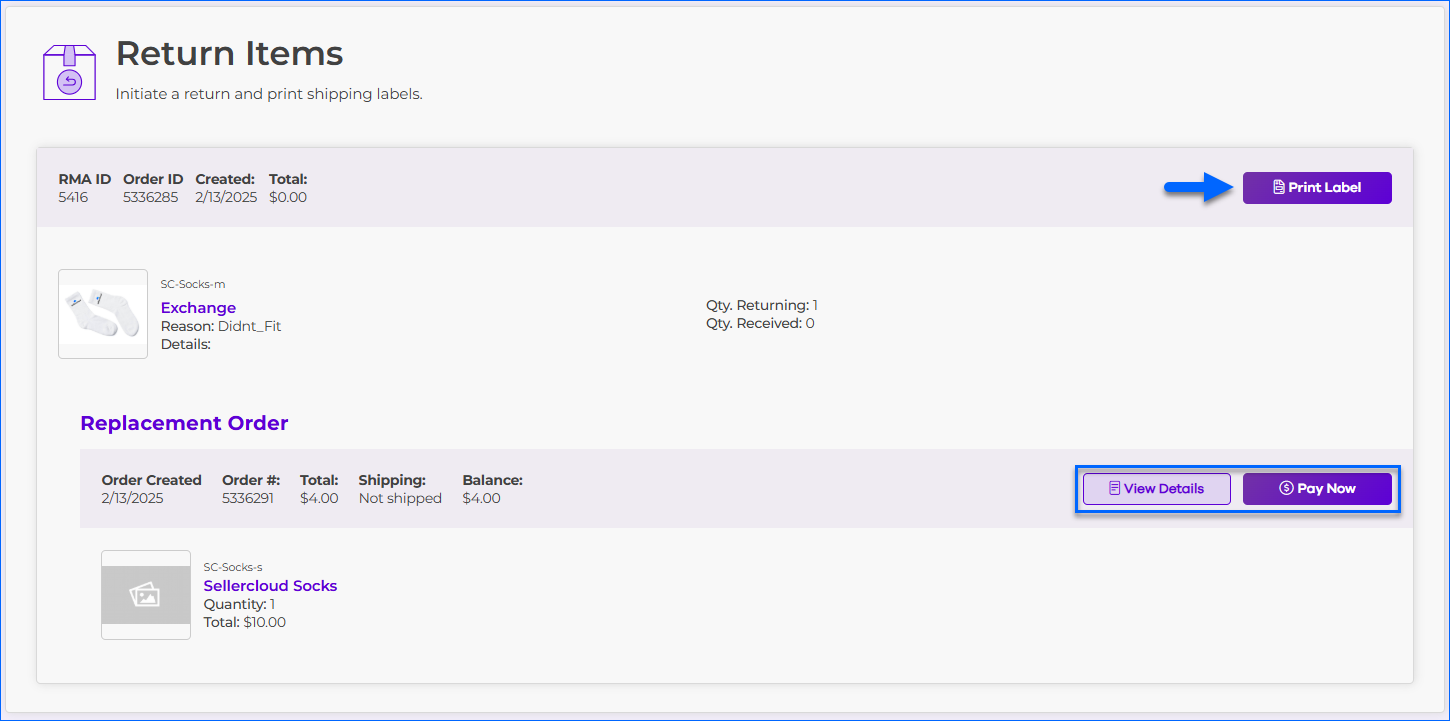
- The Orderback RMA Details page with return instructions and shipping labels appears. The customer can click the Print button to print the page. They will also receive an email confirmation based on the second template on the Email Templates page.
If the Require approval before shipping RMA setting is enabled on the General Settings page, the shipping labels will only be available after you approve the RMA on the RMA Dashboard. If the setting is disabled, a label will be generated automatically based on your pre-defined Shipping Rules upon completion.
- The original order will still appear on the Orders and Returns Portal.
- If the order was shipped when the customer requested the RMA, they’ll see that a return has been requested and can click View Details to go to the RMA Details page.
- If the order was not shipped when the customer requested the RMA, they’ll see it was placed on hold and will not be shipped.
- If the order was shipped when the customer requested the RMA, they’ll see that a return has been requested and can click View Details to go to the RMA Details page.
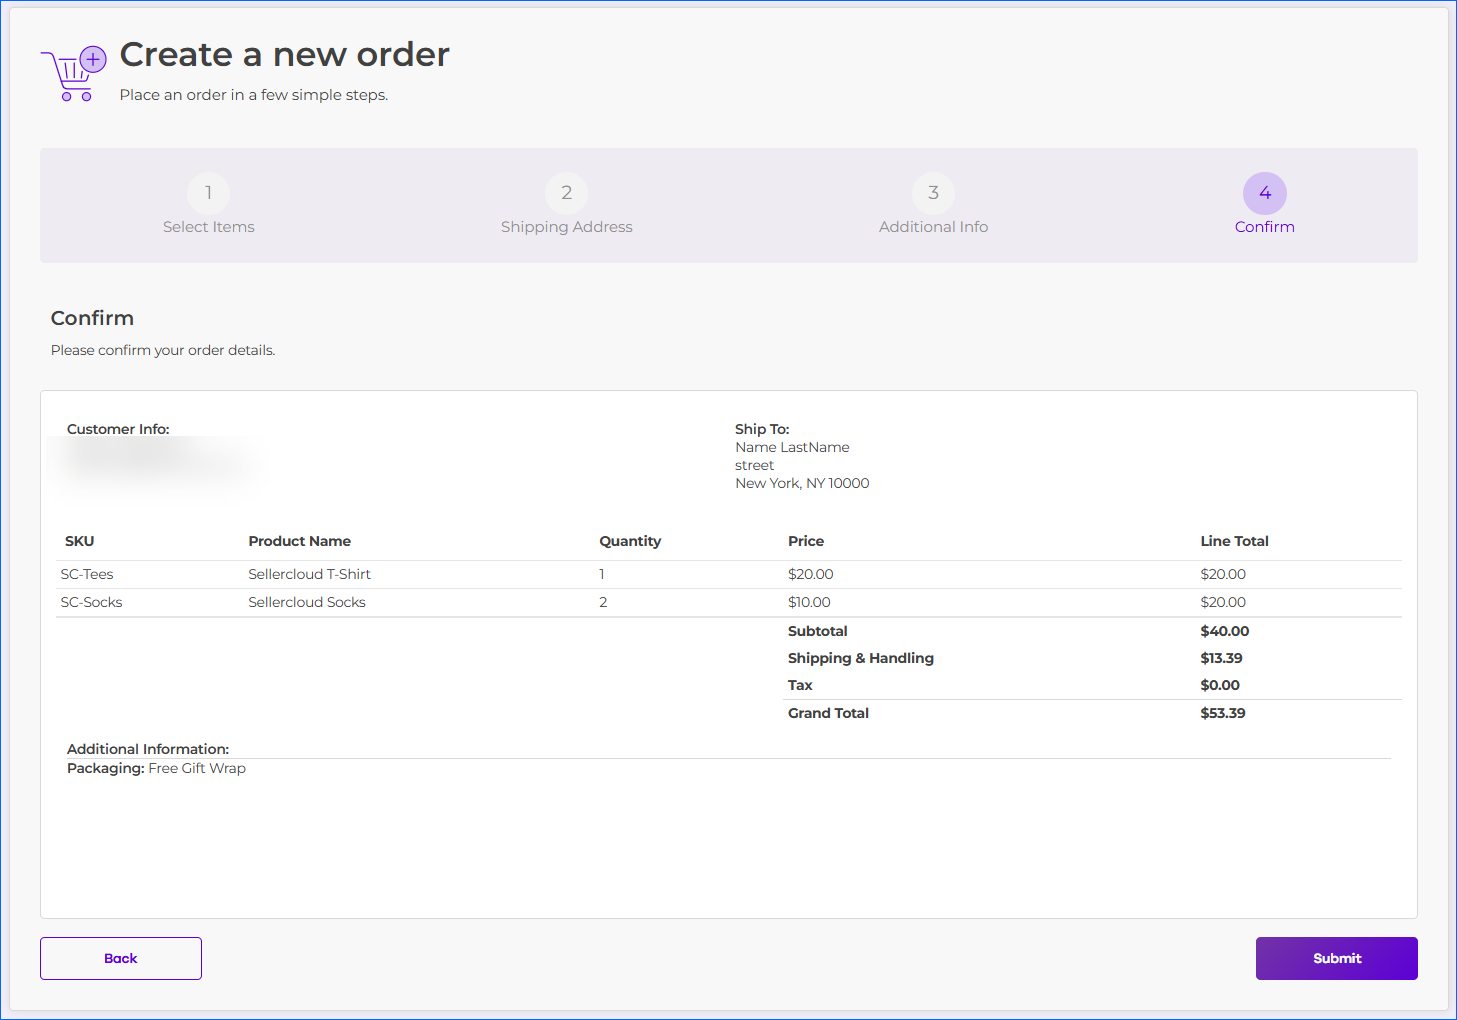
Order Creation
If your customers choose to look up their orders by Email address, they can create a new order from the Orders and Returns Portal.
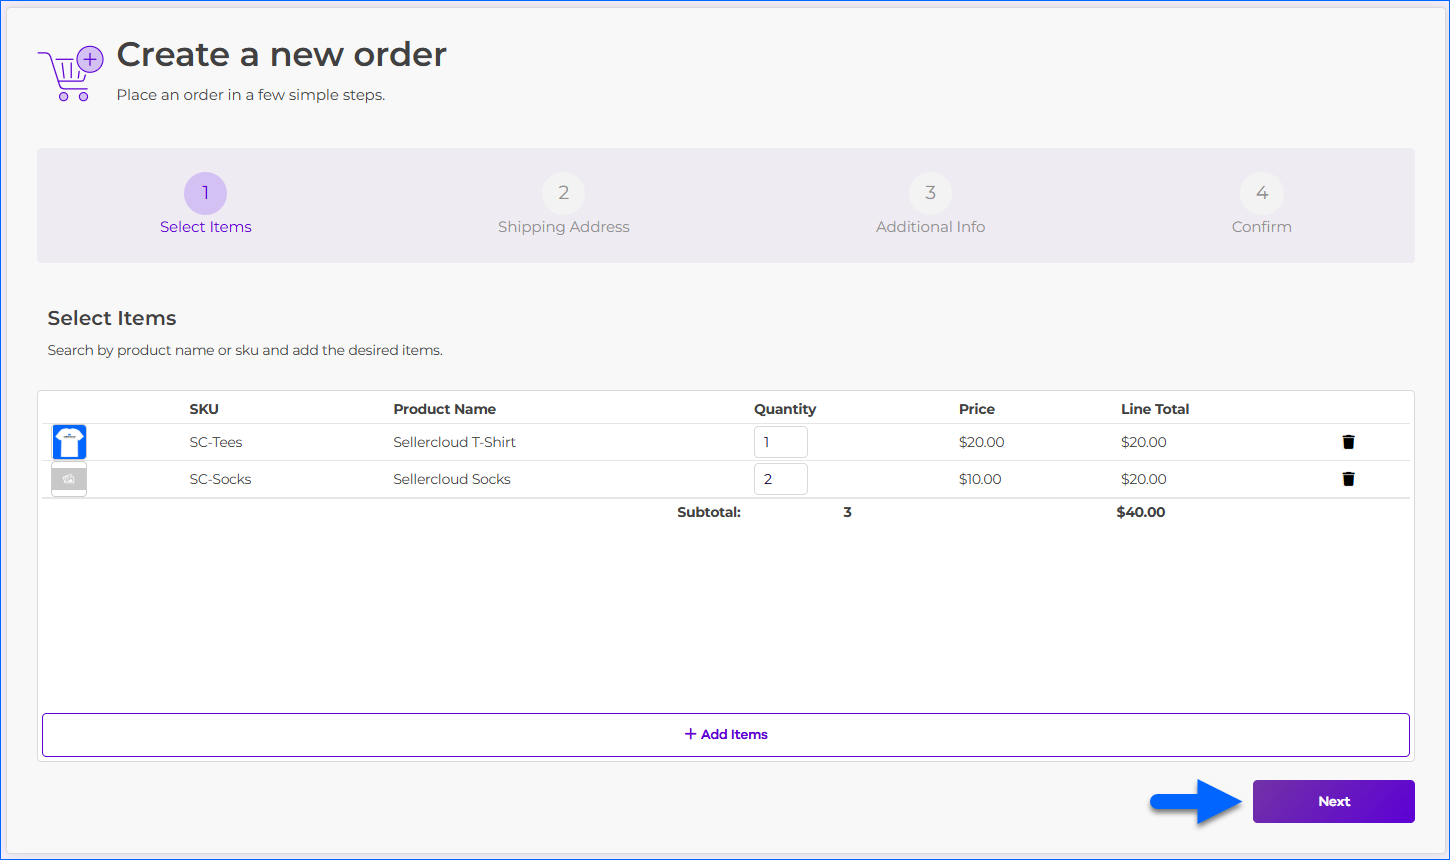
To create a new order as a customer:
- Log into the Orders and Returns Portal via email.
- Select New Order on the left.
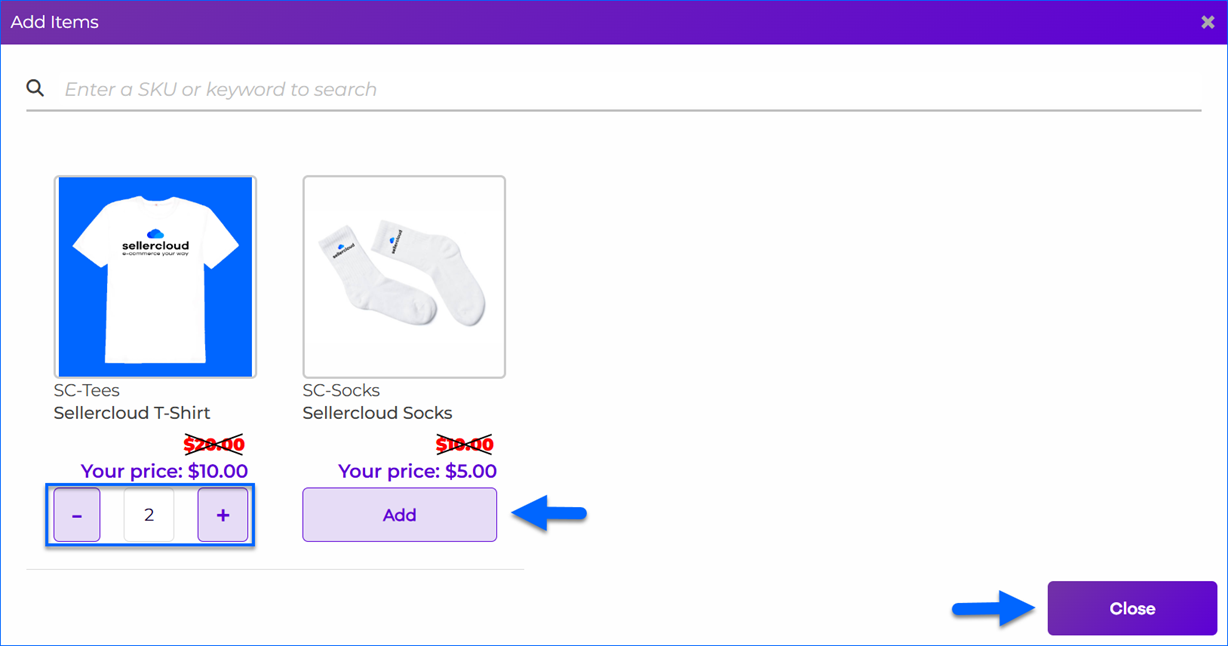
- Click Add items.

- Type the Sellercloud SKU or Product Name of the item you want to order. Click Add. Use the + and – buttons to adjust the item quantity. When you have added all the desired products, click Close.
- Click Next.
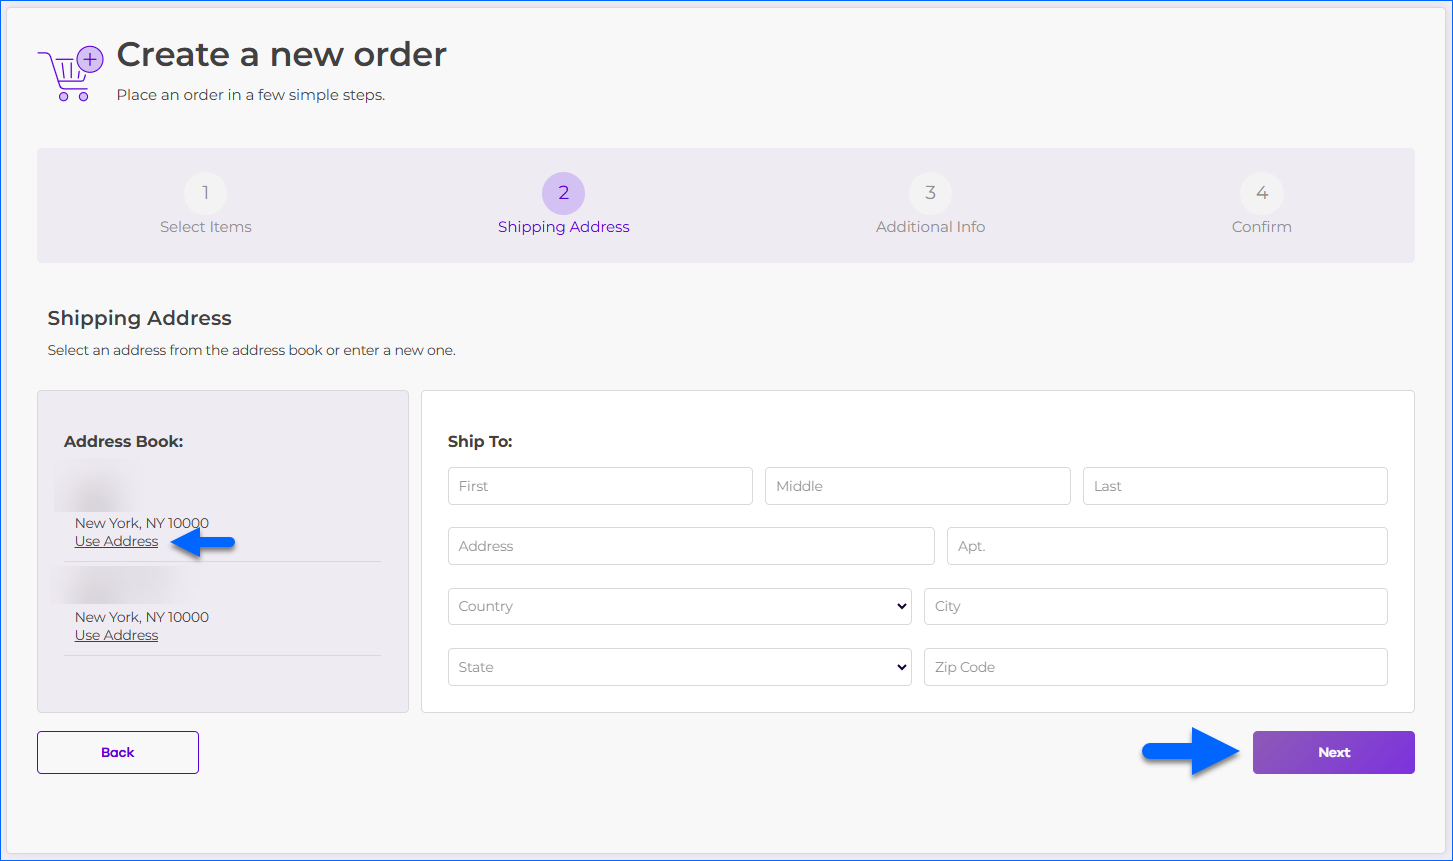
- Enter your Ship To details. If you have an address in the Address Book, click Use Address to automatically populate the fields.
- If the Allow pickup on new orders General Setting is enabled, your customers will have the option to select Pickup in Store during this step.

- If the Allow pickup on new orders General Setting is enabled, your customers will have the option to select Pickup in Store during this step.
- Click Next.
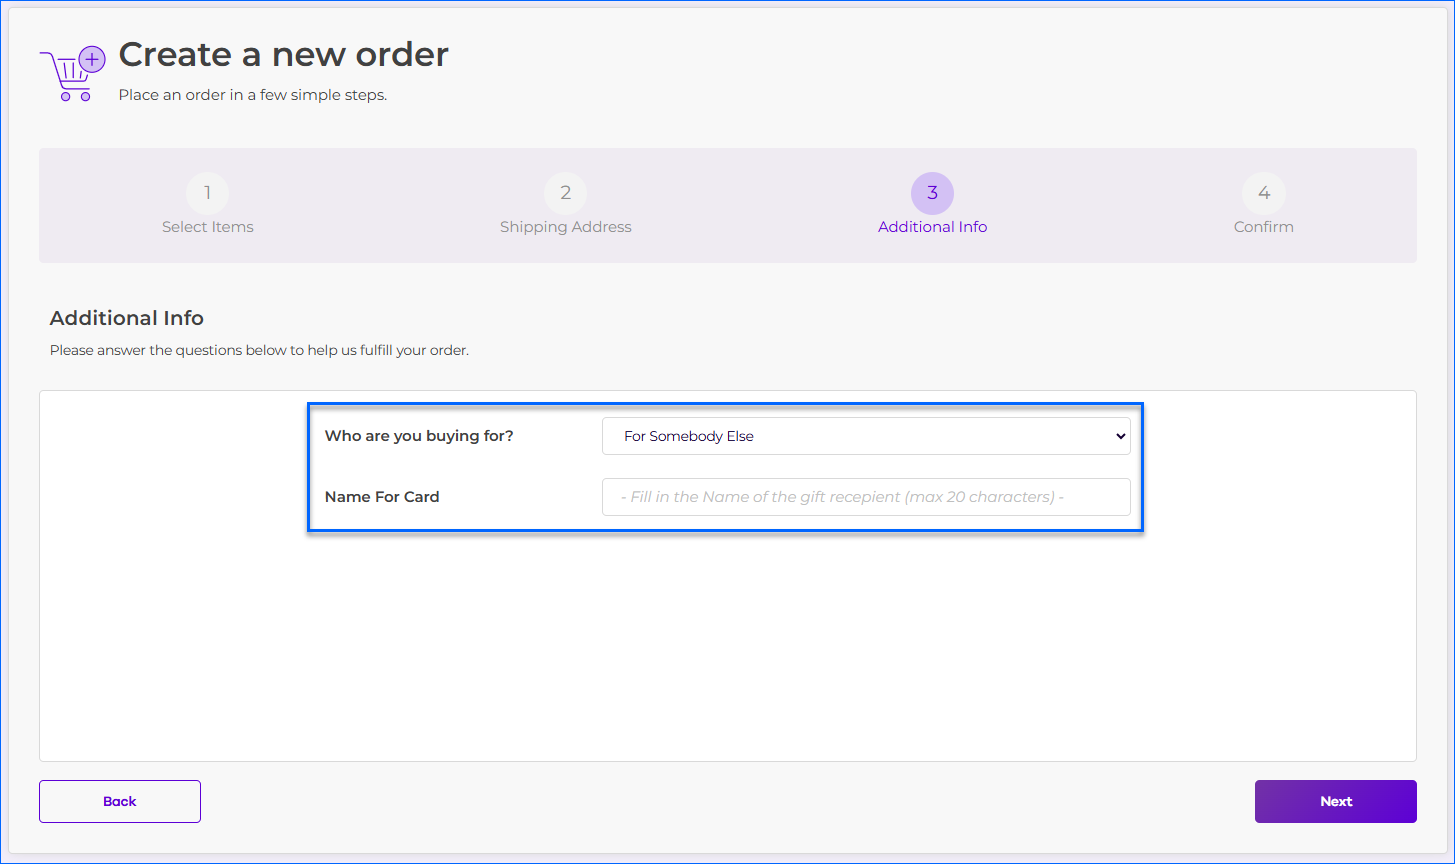
- (Optional) If you have configured Additional Prompts in the Admin Portal, they will be included as Step 3 in the Order Creation Wizard. The customer will provide their replies and click Next.
- On the Confirm tab, review the details and click Create Order.